
Creating a newspaper headline graphic
 A simple, beginner-level Photoshop tutorial to create a “ripped from the headlines” graphic with a transparent background at print-quality resolution.
Open a new document in Photoshop, approximately 6 inches wide and 2 inches tall, at 300 dpi, grayscale. Be sure to set the background to transparent. If you save it as a .psd file you can easily re-edit the text, and the transparency will be preserved when placed into InDesign.

The Background
Click on the foreground color swatch and use the color picker dialog box to create a 10% gray (to access the color picker, click on the color swatches at the bottom of the toolbar, then use the follow settings – C: 0, M: 0, Y: 0, K: 10). Select All by hitting command-A, then go to the menu bar and go Edit – Fill and fill the selection with the foreground color.
Newsprint isn’t a clean, solid gray, so you’ll want to vary that gray up a bit and make it more textured. Go to the menu bar and go to Filter – Noise – Add Noise, set it to 13 pixels, and click the button next to gaussian. Now go Filter – Blur – Gaussian Blur and set it to 4 pixels.
Next, use the lasso tool to roughen the selection and create jagged, torn edges. Hold down the shift key while drawing to add to the selection, or hold down the option key to subtract from the selection. Then go Select – Inverse (this will reverse the selection) and hit the delete key. You’ll have something that looks about like this:

Now you’re going to add some depth using layer effects. Go to the Blending Options (either by selecting “Blending Options…” from the drop-down menu in the Layers palette, or double-clicking the layer), and click on Drop Shadow, and then Inner Glow. You can play around with the size on both, here’s how the samples were set:


There you have your newspaper background.
Adding Text
Reset your colors to default (by clicking the Default Foreground and Background Colors icon near the bottom of the toolbar, or simply hit “D” on your keyboard). Select the Text tool and click to place it over the newspaper background, and type in your headline. Choose an appropriate font (I just used Arial Black and Times New Roman in the samples).
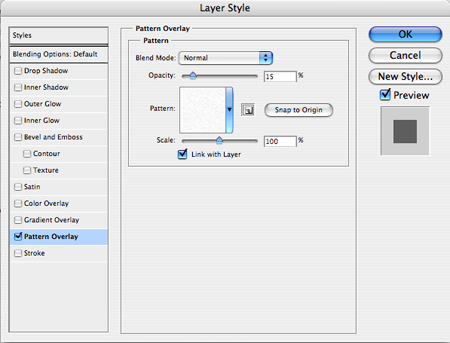
Newspaper headlines don’t appear as a solid black, though, so you need to adjust the color. Double-click the Text layer to get to the Blending Options and click on Pattern Overlay. In the Pattern picker, select Watercolor (in the Artistic Surfaces set), and set the opacity to 15%.
And there you have it! Your graphic is ready for use in a page layout application such as InDesign.
